文章阅读目录大纲
 https://github.com/xieguigang/sciBASIC/tree/master/gr/Microsoft.VisualBasic.Imaging/Drawing3D
因为大家大多数都是从小接受电子游戏,所以长大了之后能够自己从零开始开发一个完整的3维图形引擎是每一个男程序员的梦想。这个就像玩机械的男人的梦想就是自己从头开始组装一辆汽车。还好这个梦想我在几年前就已经实现了。
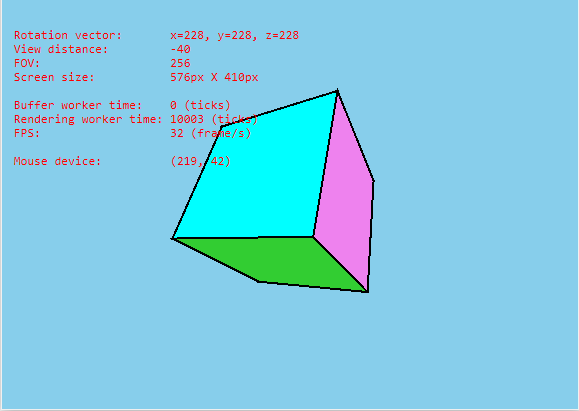
这个是一个我自己的3维图形引擎的效果演示视频:
这个三维图形是基于较早之前的一篇VB.NET的教程文章【Rotating Solid Cube Using VB.NET and GDI+】中所给出的代码基础上完成的。
在视频中所演示的3维旋转的立方体,是一个由六个面所构成的3维坐标点模型所产生的:
vertices:={
   New Point3D(-1 * d,  1 * d, -1 * d),
   New Point3D( 1 * d,  1 * d, -1 * d),
   New Point3D( 1 * d, -1 * d, -1 * d),
   New Point3D(-1 * d, -1 * d, -1 * d),
   New Point3D(-1 * d,  1 * d,  1 * d),
   New Point3D( 1 * d,  1 * d,  1 * d),
   New Point3D( 1 * d, -1 * d,  1 * d),
   New Point3D(-1 * d, -1 * d,  1 * d)
}在上面的模型代码之中,因为立方体的构造非常的简单,我们只需要围绕立方体的中心创建8个顶点即可,然后基于这8个顶点构建出立方体的6个面。在上面的代码中,引用到了一个名字叫做Point3D
''' <summary>
''' Defines the Point3D class that represents points in 3D space with <see cref="Single"/> precise.
''' Developed by leonelmachava <leonelmachava@gmail.com>
''' http://codentronix.com
'''
''' Copyright (c) 2011 Leonel Machava
''' </summary>
<XmlType("vertex")> Public Structure Point3D
    Implements PointF3D

    ''' <summary>
    ''' The depth of a point in the isometric plane
    ''' </summary>
    ''' <returns></returns>
    Public ReadOnly Property Depth As Double
        <MethodImpl(MethodImplOptions.AggressiveInlining)>
        Get
            ' z is weighted slightly to accommodate |_ arrangements
            Return Me.X + Me.Y - 2 * Me.Z
        End Get
    End Property

    <XmlAttribute("x")> Public Property X As Double Implements PointF3D.X
    <XmlAttribute("y")> Public Property Y As Double Implements PointF3D.Y
    <XmlAttribute("z")> Public Property Z As Double Implements PointF3D.Z

    Public Sub New(x!, y!, Optional z! = 0)
        Me.X = x
        Me.Y = y
        Me.Z = z
    End Sub

    Public Sub New(p As PointF, z!)
        Me.X = p.X
        Me.Y = p.Y
        Me.Z = z
    End Sub

    Public Sub New(p As Point)
        Call Me.New(p.X, p.Y)
    End Sub

    Public Overrides Function ToString() As String
        Return Me.GetJson
    End Function
End Structure
以这个Point3D为基础,在这个基础对象中集成了3D图形处理所必须的一些基础操作,例如:旋转与投影等。下面的一些对3D图形操作的原理信息的介绍,来自于一篇教程文章:
https://www.siggraph.org/education/materials/HyperGraph/modeling/mod_tran/3drota.htm

3维旋转


' X-axis rotation looks like Z-axis rotation if replace:
'
'  X axis with Y axis
'  Y axis with Z axis
'  Z axis with X axis
'
'
' So we do the same replacement in the equations:
'
' y' = y*cos(q) - z*sin(q)
' z' = y*sin(q) + z*cos(q)
' x' = x
'
'         |1      0       0   0|
' Rx(q) = |0  cos(q)  sin(q)  0|
'         |0 -sin(q)  cos(q)  0|
'         |0      0       0   1|
'
''' <summary>
'''
''' </summary>
''' <param name="angle">Degree.(度,函数里面会自动转换为三角函数所需要的弧度的)</param>
''' <returns></returns>
Public Function RotateX(angle As Single) As Point3D
    Dim rad As Single, cosa As Single, sina As Single, yn As Single, zn As Single

    rad = angle * stdNum.PI / 180
    cosa = stdNum.Cos(rad)
    sina = stdNum.Sin(rad)
    yn = Me.Y * cosa - Me.Z * sina
    zn = Me.Y * sina + Me.Z * cosa
    Return New Point3D(Me.X, yn, zn)
End Function
' Y-axis rotation looks like Z-axis rotation if replace:
'
'  X axis with Z axis
'  Y axis with X axis
'  Z axis with Y axis
'
' So we do the same replacement in equations :
'
' z' = z*cos(q) - x*sin(q)
' x' = z*sin(q) + x*cos(q)
' y' = y
'
'         |cos(q)  0  -sin(q)  0|
' Ry(q) = |    0   1       0   0|
'         |sin(q)  0   cos(q)  0|
'         |    0   0       0   1|
'
Public Function RotateY(angle As Single) As Point3D
    Dim rad As Single, cosa As Single, sina As Single, Xn As Single, Zn As Single

    rad = angle * stdNum.PI / 180
    cosa = stdNum.Cos(rad)
    sina = stdNum.Sin(rad)
    Zn = Me.Z * cosa - Me.X * sina
    Xn = Me.Z * sina + Me.X * cosa

    Return New Point3D(Xn, Me.Y, Zn)
End Function
' Z-axis rotation is identical to the 2D case:
'
' x' = x*cos q - y*sin q
' y' = x*sin q + y*cos q
' z' = z
'
'          | cos q  sin q  0  0|
' Rz (q) = |-sin q  cos q  0  0|
'          |     0      0  1  0|
'          |     0      0  0  1|
'
Public Function RotateZ(angle As Single) As Point3D
    Dim rad As Single, cosa As Single, sina As Single, Xn As Single, Yn As Single

    rad = angle * stdNum.PI / 180
    cosa = stdNum.Cos(rad)
    sina = stdNum.Sin(rad)
    Xn = Me.X * cosa - Me.Y * sina
    Yn = Me.X * sina + Me.Y * cosa
    Return New Point3D(Xn, Yn, Me.Z)
End Function
3维投影
''' <summary>
''' Project the 3D point to the 2D screen. By using the projection result,
''' just read the property <see cref="Projection.PointXY"/>.
''' (将3D投影为2D,所以只需要取结果之中的<see cref="X"/>和<see cref="Y"/>就行了)
''' </summary>
''' <param name="viewWidth"></param>
''' <param name="viewHeight"></param>
''' <param name="fov">256默认值</param>
''' <param name="viewDistance"></param>
''' <returns></returns>
Public Function Project(viewWidth%, viewHeight%, fov%, viewDistance!, Optional offset As PointF = Nothing) As Point3D
    Dim factor As Single, Xn As Single, Yn As Single

    factor = fov / (viewDistance + Me.Z)
    Xn = Me.X * factor + viewWidth / 2 + offset.X
    Yn = Me.Y * factor + viewHeight / 2 + offset.Y

    Return New Point3D(Xn, Yn, Me.Z)
End Function
二维多边形
在完成了三维投影操作之后,我们需要将三维模型以2D平面绘制操作可以接受的数据结构展现出来。在这里创建了一个Surface对象用来表示3维多边形投影到二维平面的结果:
''' <summary>
''' Object model that using for the 3D graphics.
''' (进行实际3D绘图操作的对象模型,这个对象实际上就是相当于Path3D??)
''' </summary>
Public Structure Surface
    Implements IEnumerable(Of Point3D)
    Implements I3DModel

    ''' <summary>
    ''' Vertix in this list have the necessary element orders
    ''' for construct a correct closed figure.
    ''' (请注意,在这里面的点都是有先后顺序分别的)
    ''' </summary>
    Public vertices() As Point3D
    ''' <summary>
    ''' Drawing texture material of this surface.
    ''' </summary>
    Public brush As Brush

    Sub New(v As Point3D(), b As Brush)
        brush = b
        vertices = v
    End Sub

    Public Sub Draw(ByRef canvas As IGraphics, camera As Camera) Implements I3DModel.Draw
        Dim path = New PointF(vertices.Length - 1) {}
        Dim polygon As New GraphicsPath

        For Each pt As SeqValue(Of Point3D) In camera.Project(vertices).SeqIterator
            path(pt.i) = pt.value.PointXY(camera.screen)
        Next

        Dim a As PointF = path(0)
        Dim b As PointF

        For i As Integer = 1 To path.Length - 1
            b = path(i)
            polygon.AddLine(a, b)
            a = b
        Next

        Call polygon.AddLine(a, path(0))
        Call polygon.CloseFigure()
        Call canvas.DrawPath(Pens.Black, polygon)
    End Sub
End Structure- R#环境中的热图颜色 - 2025年6月11日
- HE染色结果怎么看 - 2025年6月10日
- 脂质组学概述 - 2025年6月10日


One response
[…] 【3维图形技术】3D旋转的立方体 […]