
文章阅读目录大纲
 https://github.com/xieguigang/sciBASIC
最近在空间代谢组学中的质谱成像应用开发过程中,会需要使用到一些图像处理算法对原始的质谱成像结果图片进行诸如平滑,放大等处理。顺着图像平滑的算法搜索,通过搜索引擎找到了一个年代比较久远的图像处理算法博客文章,将其中的图像算法重新实现了一下,在这里分享给大家。
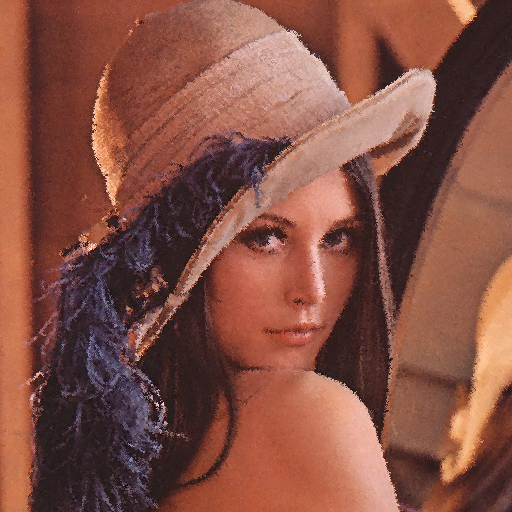
在进行算法代码的讲解之前,我们先展示出用于我们的图像滤镜算法的标准测试图片《莱娜·舍布洛姆》:

莱娜·瑟德贝里(瑞典文:Lena Soderberg),1951年3月31日出生于瑞典,在1972年11月期的《花花公子》杂志中,她化名为莱娜·舍布洛姆,成为了当期的玩伴女郎。她的中间折页照片由Dwight Hooker拍摄。她的照片(即莱娜图)后来被数字图像处理领域所广泛使用。1997年,在图像科学和技术协会(英语:Society for Imaging Science and Technology)的第50届会议上,她被邀为贵宾出席。在会议上,她忙于签名、拍照以及介绍自我。
前言
在解说算法代码之前,我们先来了解我在R#脚本环境的基础模块之中对本文中所提到的图像处理算法的一个函数封装的程序包模块:
imports "filter" from "graphics";

emboss;
pencil;
wood_carving;
diffusion;
soft;
sharp;将对应的程序包模块导入之后,就可以在R#脚本编程之中使用本文所提及的图像滤镜函数了。在本文中所有所实现的图像滤镜算法都是基于一个中心像素点F4*4,共16个像素,分别用A-L来代表:
A   B   C  D
E  [F]  G  H
I   J   K  L
M N O P下文中所提及的所有的图像滤镜算法的实现代码,大家都可以在这个源代码文件之中找得到:Microsoft.VisualBasic.Imaging/Filters/Effects.vb
图像锐化处理
锐化的算法很简单,就是比较相邻的几个像素,把当前像素加上和周围的像素的差就可以了。我们从A点开始做图片中的像素处理,计算出差值:
' delta = A - (B + E + F) / 3
' F = F + delta * alpha

Dim Div1 As Single = 1 + SharpDgree
Dim Div2 As Single = -SharpDgree / 3

For x As Integer = 0 To OutPutWid - 2
    For y As Integer = 0 To OutPutHei - 2
        Dim RR = img.GetPixel(0, x, y) * Div1
        Dim GG = img.GetPixel(1, x, y) * Div1
        Dim BB = img.GetPixel(2, x, y) * Div1
        Dim Ix = x + 1
        Dim Iy = y + 1

        ' B + E + F
        Dim R = img.GetPixel(0, Ix, Iy) + img.GetPixel(0, x, Iy) + img.GetPixel(0, Ix, y)
        Dim G = img.GetPixel(1, Ix, Iy) + img.GetPixel(1, x, Iy) + img.GetPixel(1, Ix, y)
        Dim B = img.GetPixel(2, Ix, Iy) + img.GetPixel(2, x, Iy) + img.GetPixel(2, Ix, y)

        RR = RR + R * Div2
        GG = GG + G * Div2
        BB = BB + B * Div2

        Call img.SetPixel(0, x, y, RR)
        Call img.SetPixel(1, x, y, GG)
        Call img.SetPixel(2, x, y, BB)
    Next
Next
Lena图像锐化效果
bitmap(file = "./lena_sharp.png") {
    readImage("lena.jpg") |> sharp;
}
图像柔化处理
柔化的算法和锐化相近似,不过作用正好相反,就是把当前点用周围几个点的平均值来代替。
' F = (A+B+C+E+F+G+I+J+K) / 9
' G = (B+C+D+F+G+H+J+K+L) / 9

For x As Integer = 1 To OutPutWid - 2
    For y As Integer = 1 To OutPutHei - 2
        ' F = (A + B + C + E + F + G + I + J + K) / 9
        Dim A = img.GetPixel(x - 1, y - 1)
        Dim B = img.GetPixel(x, y - 1)
        Dim C = img.GetPixel(x + 1, y - 1)
        Dim E = img.GetPixel(x - 1, y)
        Dim F = img.GetPixel(x, y)
        Dim G = img.GetPixel(x + 1, y)
        Dim I = img.GetPixel(x - 1, y + 1)
        Dim J = img.GetPixel(x, y + 1)
        Dim K = img.GetPixel(x + 1, y + 1)

        Dim RR = New Integer() {A.R, B.R, C.R, E.R, F.R, G.R, I.R, J.R, K.R}.Average
        Dim GG = New Integer() {A.G, B.G, C.G, E.G, F.G, G.G, I.G, J.G, K.G}.Average
        Dim BB = New Integer() {A.B, B.B, C.B, E.B, F.B, G.B, I.B, J.B, K.B}.Average

        Call img.SetPixel(0, x, y, RR)
        Call img.SetPixel(1, x, y, GG)
        Call img.SetPixel(2, x, y, BB)
    Next
Next
Lena图像柔化效果
bitmap(file = "./lena_soft.png") {
    readImage("lena.jpg") |> soft;
}
水彩画风格
水彩画风格的滤镜算法很简单,就是将当前点用周围的随即的点来代替。至于选哪一点,可以用一个随即数来选定。
Static point As Integer() = {-1, 0, 1}

For x As Integer = 1 To OutPutWid - 2
    For y As Integer = 1 To OutPutHei - 2
        ' A  B  C  D
        ' E  F  G  H
        ' I  J  K  L
        ' M  N  O  P

        ' F = random(A, B, C, E, F, G, I, J, K)
        Call img.SetPixel(x, y, img.GetPixel(x + randf.Next(point), y + randf.Next(point)))
    Next
Next
Lena图像水彩画风格
bitmap(file = "./lena_diffusion.png") {
    readImage("lena.jpg") |> diffusion;
}
雕刻风格
对于图像雕刻风格的实现,就是将相邻的两个像素相减,得到的差加上127作为新的值。因为中心像素点F有8个邻居像素,所以我们可以拥有8个雕刻方向:
<Extension>
Public Function Emboss(img As BitmapBuffer,
                       Optional directionX As Integer = 1,
                       Optional directionY As Integer = 1,
                       Optional Lighteness As Integer = 127) As BitmapBuffer

    Dim OutPutWid = img.Width
    Dim OutPutHei = img.Height

    For x As Integer = 1 To OutPutWid - 2
        For y As Integer = 1 To OutPutHei - 2
            ' A  B  C  D
            ' E  F  G  H
            ' I  J  K  L
            ' M  N  O  P

            ' A = B - A + 127
            Dim pB = img.GetPixel(x, y)
            Dim pA = img.GetPixel(x + directionX, y + directionY)
            Dim R = pB.R - pA.R + Lighteness
            Dim G = pB.G - pA.G + Lighteness
            Dim B = pB.B - pA.B + Lighteness

            Call img.SetPixel(x, y, R, G, B)
        Next
    Next

    Return img
End Function
Lena图像雕刻风格
bitmap(file = "./lena_emboss.png") {
    readImage("lena.jpg") |> emboss;
}
铅笔画风格与木雕风格
对于铅笔画风格以及木雕风格,这两种风格滤镜的算法非常的相似。首先要说一下人的眼睛对于图像的观察,人的眼睛对于灰度(亮度)的敏感要远远大于对色彩的敏感,而人的眼睛对于暖色调和冷色调的敏感有要远大于对一般色彩的敏感度。经过大量的测试,人们得到了一个经验公式,来说明人的眼睛是如何识别亮度的:
Gray = Red * 0.3 + Green * 0.6 + Blue * 0.1我们只要设定一个阀值,把电脑上的图片中的像素的色彩转化为灰度,再把相邻的两个像素的灰度去比较,当灰度变化超过一定的量的时候,我们就判断它是轮廓。之后我们再根据选项将轮廓设定为白色或者黑色即可实现铅笔画风格或者木雕风格了:
For I As Integer = 0 To OutPutWid - 2
    M = I + 1
    For L As Integer = 0 To OutPutHei - 2
        N = L + 1
        Col = img.GetPixel(0, I, L) * 3 + img.GetPixel(1, I, L) * 6 + img.GetPixel(2, I, L)
        Col = Col / 10
        ColNext = img.GetPixel(0, M, N) * 3 + img.GetPixel(1, M, N) * 6 + img.GetPixel(2, M, N)
        ColNext = -ColNext / 10

        If Col + ColNext > Sensitivity Then
            If Not woodCarving Then
                img.SetPixel(I, L, 0, 0, 0)
            Else
                img.SetPixel(I, L, 255, 255, 255)
            End If
        Else
            If Not woodCarving Then
                img.SetPixel(I, L, 255, 255, 255)
            Else
                img.SetPixel(I, L, 0, 0, 0)
            End If
        End If
    Next
Next
铅笔画风格

木雕风格
bitmap(file = "./lena_pencil.png") {
    readImage("lena.jpg") |> pencil;
}

bitmap(file = "./lena_wood_carving.png") {
    readImage("lena.jpg") |> wood_carving;
}- 单细胞视角下的微生物基因组代谢酶嵌入分析 - 2026年2月25日
- 基因组代谢酶层级嵌入 - 2026年2月23日
- 基因组功能吉布斯LDA主题建模 - 2026年2月23日

No responses yet